Thursday, February 29, 2024

Subscription billing - Recognizing revenue for Billing schedule.

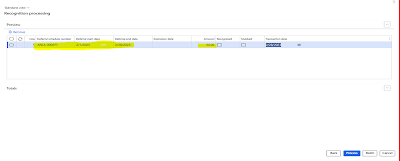
The form Recognition processing can be accessed from the below path. This form is used to fetch lines from the relevant deferral schedule.

Path: Subscription billing > Revenue contract billing > Revenue and expense deferrals > Periodic tasks > Recognition processing 


Prepare and validate Revenue recognition journal:

Using Recognition processing wizard recognition Journal can be processed this will allow user to create and post Recognition Journal.

In Revenue Recognition processing wizard user can define Journal name, cut-off date to recognized revenue of deferral schedules falling on or before this date. filter can also be applied on specific Sales order and Deferral schedule number.


Prepare and validate revenue recognition journal:

Recognition journal details could be validated In Recognition processing wizard It shows the relevant lines which are filtered based on criteria put in previous step.


Validate records to be processed:

Recognition journal details should be validated In Recognition processing wizard, unwanted extra records could be removed from the list. Click on Process, system will post the create the voucher and post the Revenue Journal.

Once journal is posted, Deferred revenue will be converted to Revenue and Deferral Schedule status will become to completed. It will show the amount as recognized and Deferral account and Recognition account will also be visible after clicking on Process in “Recognition processing" wizard.


Validate posted revenue recognition: In the All-deferral schedules form, Journal batch number and Voucher number is updated.


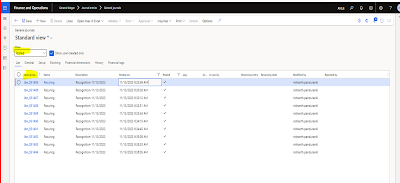
Posted recognize journal can be found in General Journal. this from can be found in below path: Path: General Ledger > Journal entries > General Journal


Deferral and Revenue accounts can be validated along with Deferral amount from the relevant General Journal Lines.  


Enjoy!


Project timesheet entry adjustments in D365 Finance and Operations

 Go to the relevant Projects for which posted transactions has to be adjusted or follow below path to select the relevant project:

Path: Project management and accounting > Projects > All projects

Select the Manage tab and from Related information group click on Posted transactions.


 Provide the filter criteria to select duplicated posted transaction which needs to be adjusted. Once selected, click on Adjust transactions from Process tab.


Provide the Adjustment date, on which transaction has to be adjusted:


Select the transaction which needs to be adjusted and click on OK.


Once click Ok, the selected record is ready to be posted, please verify the record details and click on Post.


D365 will systematically create the adjustment journal transaction in the background after you Post that will offset the original Timesheet entry.


Enjoy!


Define Sales tax tolerance


Setup and configuration:

To enable Sales tax tolerance on vendor invoice “Match the detail for Vendor invoice” should be enabled from Feature management:


Once feature is enabled, parameter will be enabled in the Account payable parameter form:

Path: Accounts payable > Setup > Account payable parameters

Go to Invoice validation tab and enable Enable invoice matching validation checkbox in Invoice validation group and enable Match invoice totals checkbox from Invoice totals matching group.


Above step will allow to set Tolerance for different heads.

Enable Sales tax checkbox and set If greater or less then tolerance from Display invoice totals match icon drop down and set the Tolerance.

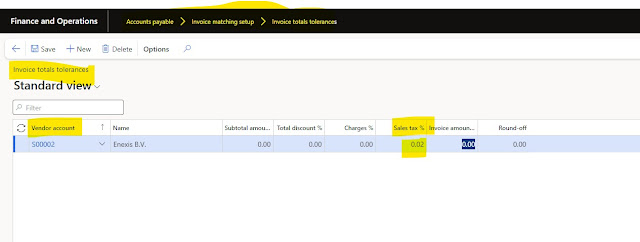
Tolerance can be set for vendor wise also from below path:

Accounts payable > invoice matching setup > total invoice tolerances


Enjoy!

Tuesday, February 27, 2024

Subscription Billing - Functionality Overview

 Subscription billing enables organizations to manage subscription revenue opportunities and recurring billing through billing schedules.

Complex pricing, billing model and revenue allocation can easily be managed using this feature.

The solution has below three modules these can be used simultaneously as well as independently as well.

  • Recurring contract billing -  This module enables recurring billing and price management to provide control over pricing and billing parameters, contract renewal and consolidated invoicing.
  • Revenue and expense deferrals - This module eliminate manual processes and dependency on external systems by managing revenue and enabling real-time insight into monthly recurring revenue.
  • Multiple element revenue allocation - This module helps with revenue compliance by handling pricing and revenue allocation across multiple items.
Details of one time setup and required steps to configure Subscription billing are provided in below links:


Creating billing schedule and defining deferral accounts

 Creating billing schedule:

Once the Trade agreement is posted, (Please go through with the link, to get more details of creating and posting of Trade agreement). The related billing schedule needs to be created:

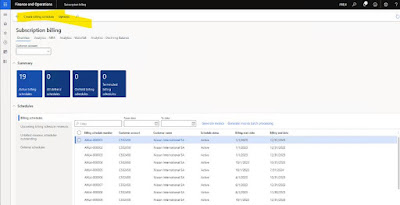
Go to path: Subscription billing workspace > Subscription billing


Create billing schedule

Select the customer and details for which the billing schedule needs to be created. Then , select the billing schedule group (default based on configuration), customer, start date.

Based on the billing schedule group, the frequency (monthly, quarterly, yearly) has been determined. In case number of periods is included (i.e. 12) the end-date is auto filled.


It will show all details for the billing schedule lines. select lines and press Generate all.


Generate batch processing:

Subscription billing > Generate invoice > select batch job set recurrence

Note: The Generate invoice button should only be used in case of prepaid fee payment.


Generate batch processing:

In the generate invoice batch processing, select the start date and billing schedule number:


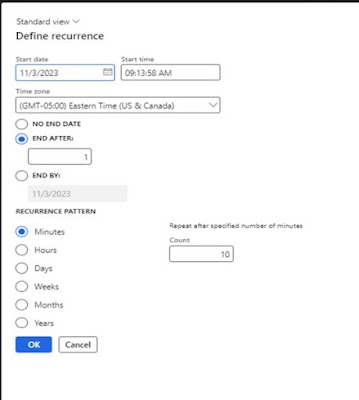
Define recurrence and press OK.

Revalidate the input in Generate invoice batch processing window and press OK.


Batch Job scheduling:

Batch jobs will be created and could be seen in scheduled Batch jobs in the system from below path.

 Path: System administration > Inquires > Batch jobs

Schedule batch job will be in Waiting state and when executed in scheduled time, sale order will be created.


Deferral schedule:

Billing schedule will be created that will fetch information for customer and billing schedule group in header.

Click on the Deferrals for selected Billing schedule lines in All Billing schedules form:


Defining deferral schedule:

A pop-up window will be opened. Based on configuration settings this item indicated as a deferral item.

The Deferred  check would be enabled for the item. configured Accounts can be visible these Accounts will be used in the process for posting.


Subscription billing - One-time setup and configuration

 Step 1: Enable Subscription Billing Solution

Subscription billing solutions can be enabled through Feature managementThis solution cannot be enabled with the Revenue recognition feature. Therefore, it must be disabled before enabling subscription billing. 

Once revenue recognition is disabled, filter the Subscription billing and enable the feature from Feature management.


Step 2: Item deferred by default:

The items that are in scope for the billing subscription module needs to e determined in order to setup default deferral schedules.

This can be done based on the following options:

  • Table (If single item needs to be assigned for deferral)
  • Group (If specific item group needs to be assigned for deferral)
  • Category (If specific category needs to be assigned for deferral)
Below and example is used for a Table item code to specify a single item. 


Step 3: Deferral defaults:

Based on the item relation, its need to define deferrals in the posting profile. Main reason of this step is to dictate the system that in which main accounts the deferral has to be recorded.


Step 4: Deferral schedule groups:

The billing schedule group will be the default billing schedule for an item relation.

The billing schedule group consist of a lot of options. For example, using billing frequency as monthly for the running the example scenario:


Step 5: Define Released product:

Select relevant released product which needs to be used for subscription billing scenario:

Path:  Go to Product information management > Products > Released product


Step 6: Create trade agreements and select the related item number based on the underlying contract


Select the relevant trade agreement journal or create a new one if needed.

On the Action Pane, select Lines in order to provide the details of the trade agreement.

Provide relevant information from contract in Trade Agreement 

  1. In the party code type field, select Table. To update the price for a specific customer.
  2. In the Account selection field, select the drop-down button to open the look-up list, find and select the desired record.
  3. In the Product code type filed, select Table. when entering Trade Agreement of type Price (sales),   must select Table in the Product code type field. This is because a price is an absolute value and can't be the generic for al products or a group of products. 
  4. The Item relation field, select the the drop-down button to open the look-up in the list, select the which product to be included in the Agreement. Make a not of the selected product.
  5. In the Amount in currency field, enter a price. Under the Details section, in the Form date field, enter a date from which this agreement will be valid.
  6. Select Save and validate the selected lines and select Post button
Select customer via account selection, determine quantity and price per quantity.
Once agreed upon the trade agreement can be posted accordingly.


Validate and post Trade Agreement:
Select View trade agreements. Review the details of created Trade Agreement, and post accordingly:


Step 7: Automatic index rate contracts on the periodic basis:
Escalation and discount option on the Billing schedule lines can be used for index purpose. Frequency of the contract can be defined as Monthly/ Quarterly/ Semi annually and Annually along with the index percentage or Amount bases. i.e. Monthly -- 10%, Quarterly - 12% and Annually - 15%


Foreign currency revaluation - Setup and configuration

 Currencies can be created and maintained from Currencies from which is available in below path:

Path: General Ledger > Currencies > Currencies


Currency exchange rate providers form can be accessed from below path:

Path: General Ledger > Currencies > Configure exchange rate providers


 Please make sure it is set to your desirable currency exchange rate provider. in my case it is set to Central bank of Europe which is listed in exchange rate provider. this will provide Exchange rates from the Central bank of Europe.

Exchange rate Types can be accessed from below path:

Please make sure Average and Closing exchange rate type are defined in the system:


Imported Currency exchange rates are visible on the click of highlighted Exchange rates on above screen shot, these exchange rates are being imported from currency Exchange rates providers as shown in above steps.


Foreign currency Revaluation can be executed and calculated from below path:

Path: General Ledger > Currencies > Foreign currency revaluation.


Please provide date range using From date and To date for which foreign currency has to be revaluated. 

Provide the main account (Profit and loss/ Balance sheet/All) which has to be revaluated.

Select the currency which has to be revaluated.

Once inputs are done Press OK button to see the revaluation amount.


Enjoy!